Up in Smoke
November 20, 2010
For well over a year now, I’ve had “flaming light bulbs” on my to-shoot list, and I’ve just now gotten around to doing it. Light bulbs come with a gas inside them that won’t burn, so the filament can glow really hot without actually catching fire. Break the glass around the filament and the gas all escapes, exposing it to the oxygen in the air. From that point, once you turn on the power, the bulb will burn brightly for a second or two and then go out.
IF YOU’RE THINKING ABOUT TRYING THIS, PLEASE HEED THE SAFETY WARNINGS AT THE BOTTOM OF THE POST.
Breaking the Glass
Possibly the most difficult part of the process is getting the glass off of the bulb without messing up the filament too badly. For my shoot today, I bought a pack of four bulbs; if you’re trying this for the first time, I strongly recommend more. Initially, I tried drilling a hole in the base of the bulb to see if I could let the gas escape with the glass still intact, so it would burn inside the bulb. Unfortunately, it turns out that the glass is sealed above the metal base, and the bulb with a hole in the base just burned normally. Since that didn’t work, I took the more blunt approach: breaking the glass.
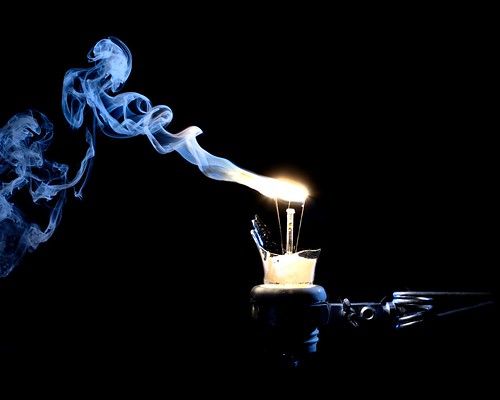
No one wants broken glass everywhere, so before breaking a bulb I stuck it in a pair of old shopping bags. I just took a pair of pliers and whacked it hard enough to break the bulb. I’m pretty sure the pressure inside the bulb is significantly lower or higher than the pressure outside it, because it pops and shatters nicely when you hit it hard enough. The trick to this is that the filament is extremely fragile, and it’s exceptionally easy to break it while shattering the bulb. Out of the four bulbs I shot, three of them came out of the bag with broken filaments (the one that didn’t break is what you see in the image above).
Thankfully, a broken filament doesn’t mean you can’t light the bulb. The filaments (in these bulbs, at least) are like coiled little springs stretched between two poles, with a kind of hoop sticking up in the middle that it feeds through. When the filaments came out broken, I just pulled both of the ends over to that hoop and nestled them in so that they stuck to it–think of it like wedging a pencil into the side of a slinky–and then electricity conducted through the hoop, connecting the ends of filament, and the bulbs still burned.
The more filament you end up with intact, the longer it will burn. The worst one that I pulled out had probably 2mm of filament total, and it burned out so fast that I couldn’t even trigger the camera while it was lit. The longest one, of course, was the one that never broke. It had easily 3 or 4cm of filament intact, and it burned for nearly two seconds.
The Setup
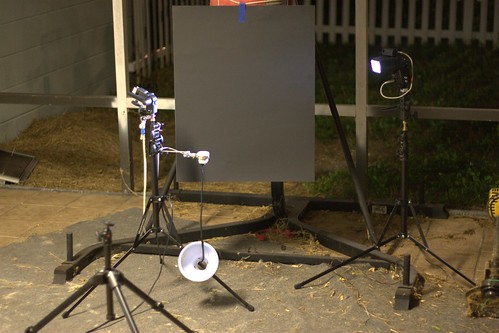
The photographic setup was pretty straightforward. Black background, lamp to hold and power the bulb, and a single speedlight to light the holder and the smoke. Here you can see the whole thing set up on my messy back porch. For a background, I just taped a sheet of black poster board to my old heavy bag. I clamped the lamp onto a light stand (and left the shade part hanging on the cord, because it wouldn’t come all the way off) with a power strip nearby to switch the power on and off, and put the speedlight back towards the background shooting into the general area the smoke would rise up into. I put my homemade cardboard gridspot on it to keep the light from spilling over onto the background.
With all that set up, I just put my camera on my crappy little tripod and attached a remote release to it. I put a bulb in the lamp, switched the power on, and triggered the remote release as soon as I saw it light up. I started at 1⁄250, ISO 200, and f/5.6, and it really blew the filament out more than I cared for. On my final attempt I stopped down to f/11 (and turned the light up to compensate), but that bulb came out with a super short filament, and it burned out before I could get a shot of it, so I had to go with the blown out bulb.
Post-processing
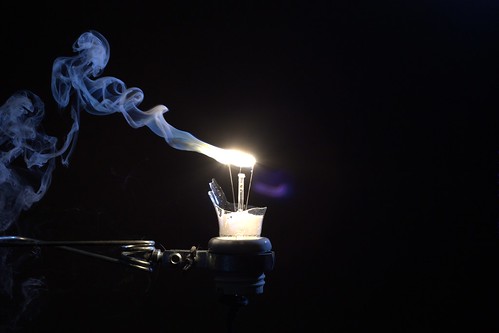
What you see above is the image that I ended up selecting from the bunch, straight out of camera. The first thing I noticed about it was that the smoke wasn’t as bright as I liked, so I made two separate RAW conversions, one to get me the ideal exposure for the smoke, another for the bulb. I masked those two together, merged the whole thing, and then made a levels adjustment to drop the entire background to pure black.
Next I decided that I wanted the lamp arm on the right side, so I made a rough lasso selection of it, pasted it onto a new layer, flipped it, moved it into place next to the bulb, and just masked it in so it would look convincing. Then I adjusted the color balance on that layer a little to make the arm blue, so it would look like it was lit by the flash, when in fact it was lit by the burning filament. Of course, I also erased the original arm from the left side, just using the brush tool with black. That’s one of my favorite parts of working with pure black or white backgrounds: you can remove extraneous bits just by brushing in white or black, no need to clone in the background.
After that, it was just housekeeping. I erased that purple flare by the filament with the brush tool, and cropped the whole thing to 8x10 to clear a little bit of the empty space on the right side. After that was all done, I had the final image you see at the top of the page. All in all, it’s a pretty easy shoot to set up, and turns out some nice images. Just be sure to get your light bulbs while you can. In 2012, they’re going to start phasing out incandescent light bulbs in the US (if you’re in the EU, I think you have even less time), and by 2014 they’ll be all but impossible to find.
I guess before I close out, I should throw in the standard safety warnings, just in case. DO NOT TOUCH THE FILAMENT OF A BULB WITH ELECTRICITY RUNNING THROUGH IT. BE CAREFUL IN GENERAL AROUND ELECTRICITY. DO NOT ATTEMPT THIS WITH A COMPACT FLUORESCENT BULB: YOU WILL NOT FIND A FILAMENT INSIDE, BUT YOU WILL FIND DANGEROUS MERCURY.