Christmas Portrait, Part I
December 16, 2010
Last year I made a Christmas portrait of my girlfriend, and we’ve decided to make a yearly tradition of it. Last year’s was a simple affair, just a standard headshot with a Santa hat and a red-gelled background. This year we’ve decided to go for something much more involved, and I’m going to be compositing two photos together. I won’t reveal my plan until the composition is finished (that should be up in a blog post tomorrow morning), but I’ll start out by walking through the creation of one of the photos I needed: a snow globe.
The Setup
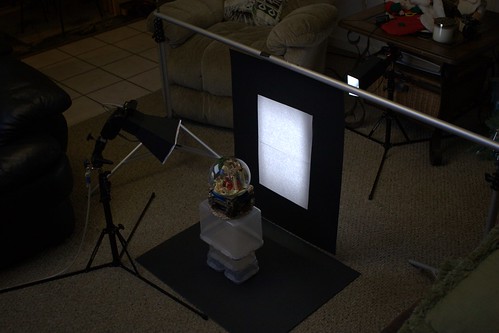
I’ve detailed a dark-frame glass setup before, and what I did this time was the opposite: a bright-field glass shot. The background was white with a black border just out of frame to refract in the edges of the glass, giving it those dark edges to define its form. To get that effect, I took a sheet of black posterboard and just cut a rectangular hole right in the middle of it, slightly larger than the snowglobe. I super-glued some white copy paper in its place, and then lit it from behind with a snooted speedlight for a nice white background with black edges. I hung that background from the crossbar of my backdrop stand with some gaffer tape, and piled together some tupperware bins to get the snow globe up to its level. For my exposure, I just set my camera to ISO 100, 1⁄250 (my max flash sync speed) and f/5.6 (to get a little bit of depth of field inside the globe) and then brought the background light’s power level up until the background was just a tiny bit short of blowing out, pushed right up on the right side of the histogram.
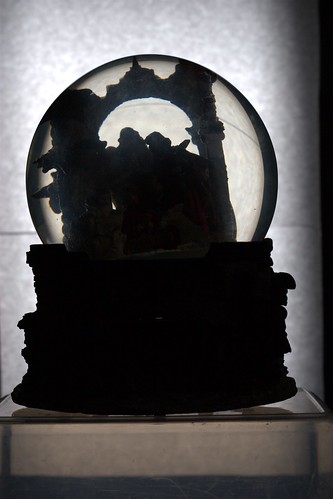
The image above shows the backdrop-only photograph (ignore the mottling in the background, that only came out because I exported this one directly from my photo manager, and it applied its own exposure compensation), which is where I would normally leave a bright-field glass shot. It’s got some nice thick lines there to define the glass’ form, but in this case there’s also a lot of foreground detail that’s been lost to the silhouetting, so I needed to add a front light. Of course I don’t want a bare speedlight, I need a light source a little bigger and softer. This is where I would normally reach for my trusty umbrella, but for glass that’s a no-go.
An umbrella makes a great portable soft light source, but when you shoot glass it reflects whatever light source you point at it right back at you. In the case of an umbrella, that means the odd shape and the spokes all show up in your image, which is not pretty. For glass you want something rectangular, so you get nice rectangular highlights, highlights that could pass for window-light. Yesterday I put together a [mini softbox][5] out of posterboard. I put that on my speedlight, set it in a little bit to the left and above the figurines in the nativity scene, and then just worked the power level up until I had a proper exposure. At that point, the only issue left was that some light from the softbox was slightly illuminating the floor and it was reflecting in the globe, so I stuck a leftover sheet of black posterboard on the ground underneath the globe. At that point, everything was just as you see it in the setup shot, and I made my final exposure.
Post-Processing
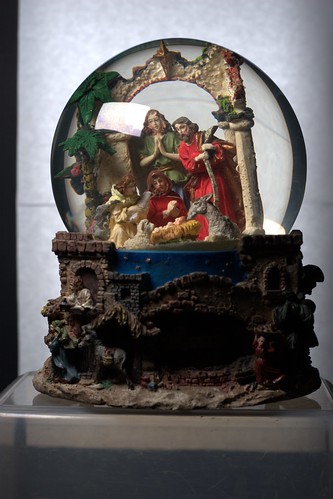
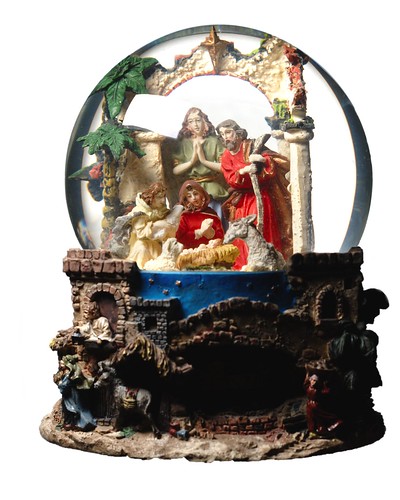
The photo above is what I had straight out of the camera, albeit poorly exposure-corrected by my photo manager. It was pretty much ready to use, save for two issues: the background wasn’t perfectly white, and the figurines inside were crooked (I have no idea how they got that way, but they’re slanted to the left inside the globe). The first was a mostly straight-forward fix. I used a levels adjustment to bring the white-level down a little, and used a white brush to clean up most of the remnants around the edges. There was still a little bit of gray along the right-most edge of the base (my snoot was a little too narrow, I guess), and of course the bottom had to be removed by hand. I made a selection around the edges of the base using GIMP’s scissor select tool, which I’ve never used before, and found that it does surprisingly well at following the edges in the image. I inverted the selection and then took a white brush to the extraneous stuff along the bottom and the right, leaving the base intact. This left me with some slightly jagged edges, but a little bit ofGaussianblur applied to just the edges fixed that right up.
Then I had to rotate the globe so that the figurines would stand straight up, which was a much bigger problem. I made two layers and copy/pasted the contents of the globe and the base onto separate layers (using the scissor-select again, with a little hand-editing in quick-mask mode) and then rotated just the globe layer. This worked surprisingly well–hooray for spheres–and by just dropping the rotated globe down a couple pixels (with the base layer above it, of course) I was able to make it fit almost perfectly. I just had to layer mask the bottom left corner a little bit to get the edge of the rotated globe and the original globe (still on the background layer) to mesh just right and erase the top of the original globe from the background layer that was sticking up over the top. With all that done, the rotated globe fit in its place, and everything looked natural as could be.
Except for one final problem. It occurred to me then, after all that time spent rotating and masking and making everything fit perfectly, that when I’d done the original levels adjustment I’d brought the levels up too much on the figurines, and now a lot of the detail in them was blowing out. Rather than re-do all that work, I just opened the original RAW conversion up in a new window, lassoed the area I’d messed up, copied it and pasted it into a new layer in the snow globe image. Rotating the replacement figurines to fit was a little difficult, but I made it work by measuring the angle between two points in both the rotated and unrotated figurines, and then rotating the unrotated ones by the difference. Then I just moved them into place over the ones that I’d messed up and used a layer mask to make sure they didn’t interfere with any of the surroundings.
When I was finally happy with everything, I cropped it down to an 8x10 image and called it quits. This certainly entailed a lot more post-processing than I’m used to (and the final composition is going to require a lot more), but the end result was definitely worth it. Tomorrow I should have part II ready, and I’ll get to reveal the final composition.