Cheap Glass
November 5, 2010
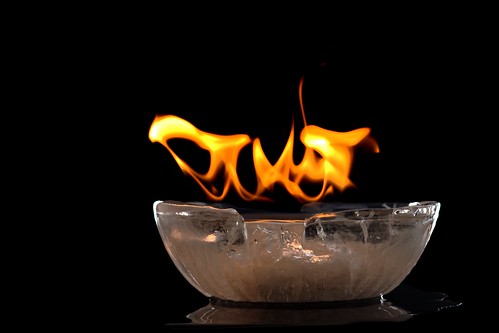
No, it’s not a post about budget lenses. Glass is one of the trickiest materials to shoot, and it helps if you have a big studio full of lights and backdrops and gobos and whatnot. Unfortunately, I don’t have any of that, so I have to get by with some less elegant equipment. Last weekend I finally went through with a crazy idea I’ve been planning for a while: I made a bowl out of ice, filled it with rubbing alcohol, and lit it on fire. With no further ado, here’s how I shot it on a budget.
Making the Bowl
This was the easy part. I took one big metal bowl, one small plastic bowl, and a roll of masking tape. I used the masking tape to secure the smaller bowl in the air over the middle of the larger bowl with strips running across the top, and then filled the space in between them with water, up to about an inch below the top of the larger bowl (remember that water expands when it freezes). Then, to make sure the tops of the bowls would stay even, I laid a piece of cardboard across the top of them and secured it down to the outer bowl with some more masking tape. I put the whole thing in the freezer for a day, took it out, and I had a bowl made of ice. To get the ice liberated from the larger bowl, I ran some hot water over the outside of the large bowl. The ice made a pretty loud cracking noise, but it stayed intact.
The Setup

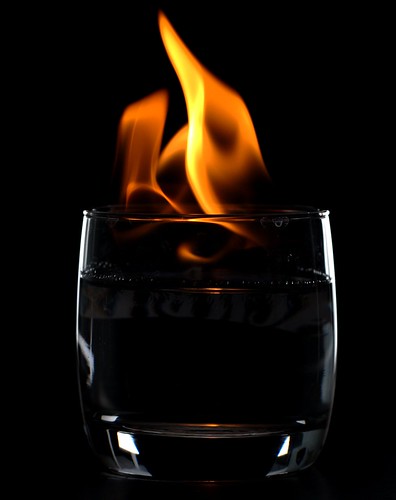
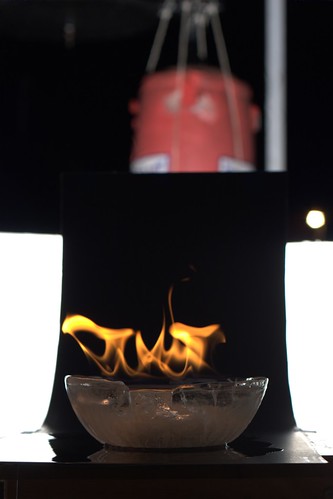
With the bowl prepared, it was time to actually set up for the shot. It’s worth noting that ice is not the same as glass, and in retrospect I should have modified my setup some toaccommodatethe fact that it’s not completely transparent, but this hadn’t occurred to me at the time. There are two kinds of glass photograph: dark field and light field. In a dark field shot, the background is black and bright lines around the edges of the glass define its form; a light field shot is exactly the opposite. In this case, I wanted a dark field shot, so I made a black backdrop by cutting a sheet of black poster board in half lengthwise, overlapping the strips, taping them together at one end, and then taping the whole thing to a TV tray like a ramp. You can see the background contraption in the setup photo above, to the left of the bright light.
That took care of the black background, but what about the lines around the edge that define the glass’ form? The trick to that is to place a second, white background just out of the frame, such that the glass can “see” that background from its perspective, around the edges of the black backdrop. That white backdrop will refract in the edges of the glass from the camera’s perspective, creating nice white lines around its edges. The last time I did glass like this, I used only a single white foamcore board for the white background, but this time my black backdrop was significantly larger, and the single white board wasn’t nearly large enough for the glass to “see” it around the black. I managed to get by with two boards (masking taped to TV trays), but once again hindsight is 20⁄20; I should have used my larger backdrop paper. As you can see, I just stuck a single light behind the black backdrop, and pointed it right at the white background boards.Those boards extended enough to the sides that some decent lines showed up in the sides of the glass, but it didn’t give me much of anything on the top and bottom. Below you can see what I got when I was testing my setup with a normal glass.
First I got my aperture set for the strobes on the backdrop, and then I set some alcohol on fire and started to bring my shutter speed down from 1⁄250 to expose it properly. I was prepared with a tripod, expecting to need a long shutter speed for a weak flame, but it turns out that 70% isopropyl alcohol burns very, very bright. In the end, I was fine at 1⁄125, so the tripod turned out to be completely unnecessary.
With my exposure set, I took the glass away, put the bowl in its place, filled it with alcohol, and lit it up. The flame also made the bowl itself light up ever so slightly, which was a great help, because by itself the translucent bowl looked pretty bad on the dark background. If not for the fire, I would have needed another light to one side of the bowl to light it up a little.
Post-processing
Unfortunately, this whole process didn’t end with the nice, clean image I’d hoped for. My makeshift black backdrop was somewhat reflective, and the white backdrop reflected off of the bottom of it as well, putting some big nasty highlights around the bowl. This is what it looked like unedited.
The first step in post-processing was the RAW conversion. I picked a white balance that I liked, and then I set a base curve that bowed down and to the right to boost the contrast a little. Once I had it converted and loaded up in GIMP (in case you didn’t know, GIMP is a free image editor along the lines of Photoshop. It’s not quite the same, but it gets the job done…for about $700 less), the first thing I did was to drag a measurement line across the top edges of the bowl and rotate it so that the bowl was nice and level. The next step was to crop it down to the general area of the bowl, and then I just used the brush tool to draw in black over the white edges that were still showing. Then I applied a levels adjustment and brought the black level up a little bit, which dropped most of the backdrop to black. To deal with the remainder, I went into quick-mask mode and selected just the bowl and the puddle of water underneath it, and then inverted the selection to get everything else. On that area I applied a levels adjustment with an even higher black level, this time getting all but the most stubborn bits of background to pure black. The ones that hadn’t quite made it I just painted over with the brush tool, making sure to keep the bowl and the puddle unselected.
With all that done, I had the bowl, by itself, on a perfectly black background. From there, I was free to add as much black as I wanted around the edges and move the bowl around at will, and I did until I found a composition that I liked. It took some significant post-processing, but I ended up with a photograph that I really like. Hopefully I’ve demystified shooting glass a little bit…feel free to barrage me with questions or critiques in the comments if I’ve left anything unclear.