Profiling Light Mod Surfaces
April 7, 2018
Recently I picked up a Rogue FlashBender, because I wanted a light modifier I can travel with and use on speedlights with a little more directionality to it than an umbrella. I love my shoot-throughs, but they throw light everywhere, and getting my hands on some studio lights, softboxes and beauty dishes recently has really given me an appreciation for lights with more control.
I got the biggest version of the FlashBender, which comes with a couple of diffusion surfaces you can stick on the front to, theoretically, create a look very much like a small softbox. I was worried about the evenness of the light, however, because the entire unit is still very shallow. So I decided to do some tests on the light mods I travel with to see just how evenly their surfaces light up. I don’t have a light meter with me on this trip, but I realized there was a much easier way to test and visualize this: just point a camera at the light.
More specifically, I put a camera on a tripod, pointed it at the light on a lightstand, and then took a lot of exposures. I started with the smallest aperture that would still blow out the entire surface of the modifier, and then kept closing it down, 1⁄3 stop at a time, until I got to an aperture value where none of the surface was blown out. Then I combined all the frames for a given modifier into a single HDR image, applied a levels adjustment so that the surface would go from almost black at the darkest to almost white at the lightest, and these gave me a view of the relative brightness of the different parts of the surface. So let’s take a look at the photos!
Westcott 43” Collapsible Umbrella
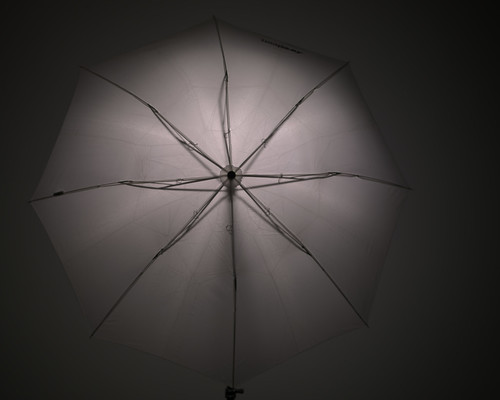
Let’s start with my old friend, the Westcott 43” double folding umbrella. I’ve used these things for literally over a decade now. I bought one with my very first lighting kit after I started on Strobist’s Lighting 101, and I’ve kept replacing them through the years as they break. And they do break pretty easily. The folding mechanism is complicated and fragile, and my compact stands have a tendency to tip over from time to time. Still, for me, this umbrella represents an excellent compromise between portability and extended size. So how evenly does it light up?
Well, the first thing I discovered by actually shooting the surface of it is that I haven’t been fully lighting it up this whole time. If I put my speedlights on their widest zoom setting, 28mm, it still wasn’t really filling the entire surface of the umbrella. I had to use the pull-down diffusion panel built into the flash to get coverage that wide. When I did, this is what it looked like.
This coverage is pretty even. It’s brighter at the center, but not overly so. You do get a little bit of a darker wedge at the bottom, which I’m guessing is the shadow of the umbrella shaft, since the flash head sits above the center of the umbrella. When shooting with speedlights and umbrellas, always remember to tilt your flash head slightly down from its neutral position, if your model supports it.
Overall, I’m pleased with this distribution. It’s not studio perfect, but for something I can attach to a lightstand without increasing its length, I’m pretty happy with this.
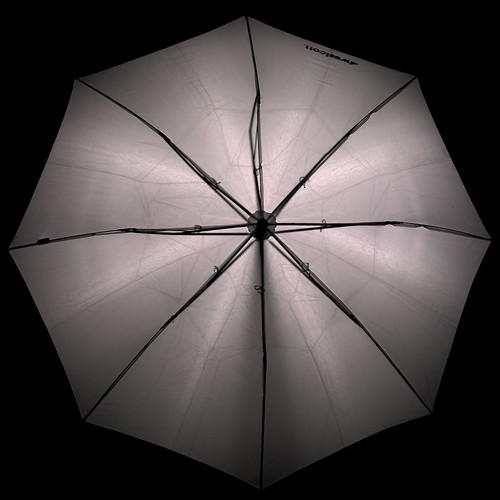
Now, the image that you just saw shows the umbrella at its normal length from the flash. Another common usage of an umbrella is to choke up on the shaft, sliding the umbrella closer to the flash to make the light a little bit harder. What happens when we do that?
When we choke up on the umbrella, it falls off significantly faster towards the edges. The entire surface of the umbrella is still lit to some degree, but the very outer extremities are barely lit. You should expect this to give you a much harder edge to your shadows from the brighter central region, but still fill them in a little bit with the diminished light from the outside.
Rogue FlashBender
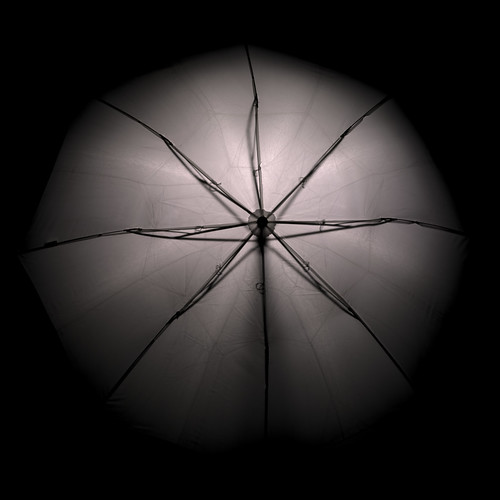
Now let’s look at the light that started me down this rabbit hole, the Rogue FlashBender. I’ll start out looking at just the FlashBender itself. This is a little bit of an unfair test, because fully extended it won’t really catch all of the light from your flash. Most of it will still make it up to a ceiling for bounce flash, and the FlashBender will just give you some forward fill. Still, I think it’s worth taking a look at just what that forward fill looks like.
Probably about what you’d expect. There are some very hot spots at the bottom, closest to the flash, and some big holes around the top and on the sides. Not terrible for a giant bounce card, but I wouldn’t be stoked about the idea of using this as a main light.
Now let’s take a look at what happens when I put the front diffusion panel on it.
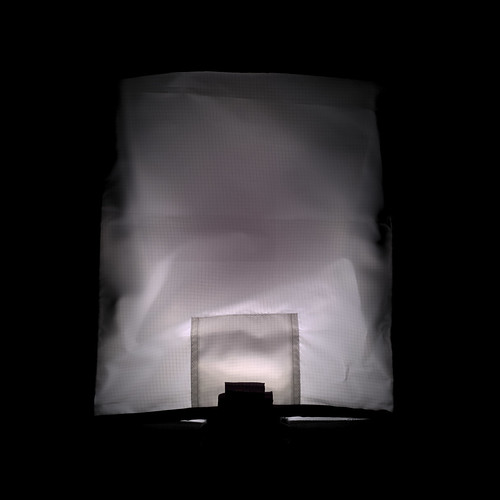
For this image, I kept the reflective surface of the FlashBender essentially straight, and just put the panel on the front. Much as you would expect, this put a very hot spot at the bottom, towards the flash head. Rogue attached an extra thick panel of the diffusion material at the bottom to counter that effect, but you can see that it’s not completely effective. The light also falls off very rapidly towards the top, to the extent that I would really consider the effective height of this modifier to be about half its real height.
I decided to try using the flexible supports built into the FlashBender to see if I could even it out a little bit. I bent the bottom edges a little bit out towards the flash, and tilted the top edges forward a little bit as well. My goal was to clear more of a path for the light from the flash head to make its way up to the top, bounce off the reflective material at the top and hopefully create a more even spread across the diffusion fabric. How did it work out?
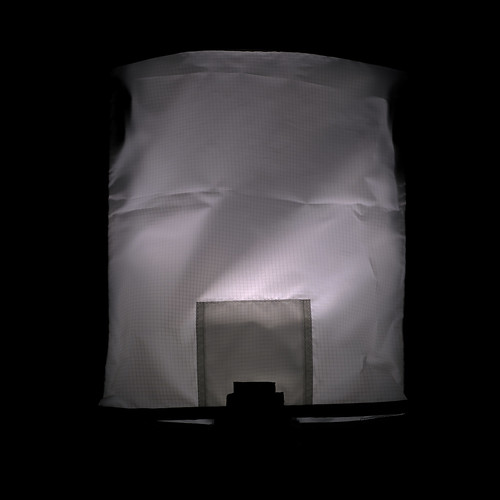
Not bad. This still isn’t what I’d call an even distribution, but getting some of the diffusion surface away from the flash head really knocked down the hot spot at the bottom. There’s still a certain amount of danger from the crinkling of the diffusion material–as you can see, when the light hits a big wrinkle it casts a significant shadow on the other side.
Still, for a portable, directional, rectangular light source, I’m basically happy with this. It’s extremely portable, and it doesn’t seem to eat as much light as a portable softbox (although I need to test that a little more rigorously).
Now, for one more test, the FlashBender also comes with a gridded striplight panel, for which you bend the outer edges of the reflective surface around to create a taller, narrower rectangle. I expected that this one would produce the most even lighting of all possible configurations, but that turned out not to be the case.
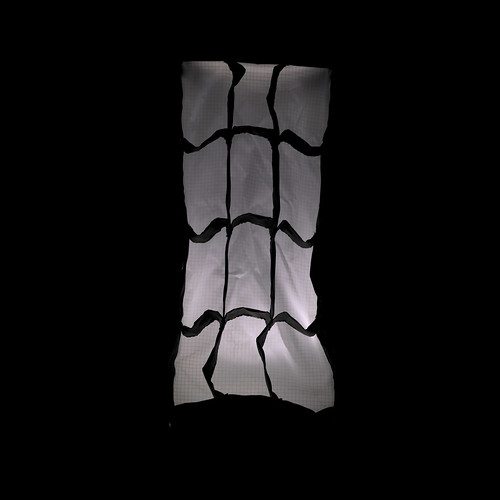
This one surprised me. I expected all the extra space to create a much more even distribution of light, but it really didn’t. It’s hot at the bottom, and you get a bright patch at the top (just below the reflective surface at the top), but not a whole lot in the middle. I guess I shouldn’t be surprised at this, because there’s nothing in the middle offering any resistance to the light just passing straight up to the top of the modifier. The reflective surface built into the top of the strip attachment will reflect at some wider angles, but by that point the inverse square law will have it in for any light that makes it back down to the middle of the diffusion surface.
Conclusions
It seems like umbrellas are still going to be your best bet for a larger, evenly lit surface on the go. The FlashBender can still put forward a reasonably evenly lit surface though, if you finesse it right. If anything is going to limit my use of the FlashBender with the diffusion panel it’s probably not going to be the light distribution so much as the fact that it’s just not that big.
It’s been an interesting experience actually looking at the surfaces of these light mods, as opposed to just making assumptions about what they would look like. Probably the biggest lesson I’ve taken away from this is that I’ve been using my umbrellas wrong this whole time, and I really need that flip-down diffuser if I want to fill the whole thing. When I get home from the trip I’m on now I’m planning to subject my studio light mods to the same treatment and see how they hold up.
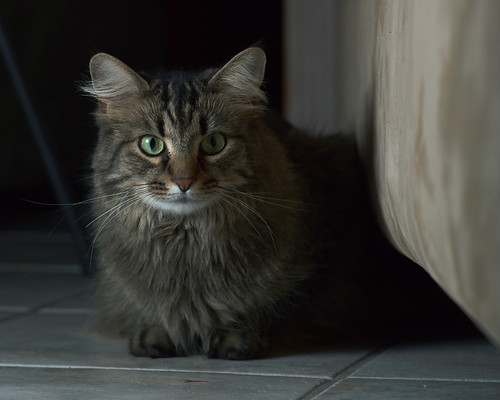
For now, I’ll close with a cat photo. Here’s my inlaws’ cat Khaleesi, who wandered over while I was testing these. I managed to get her to sit still long enough to get the FlashBender on her…just look at that rectangular catchlight!