Shooting Glass
January 20, 2014
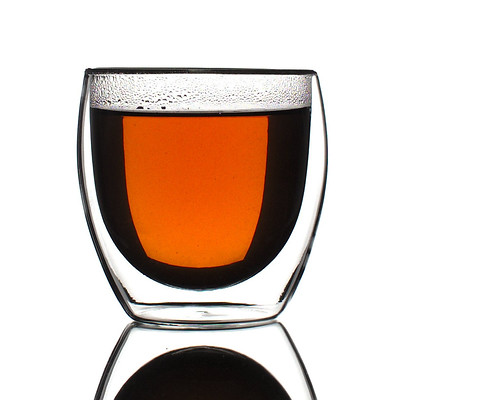
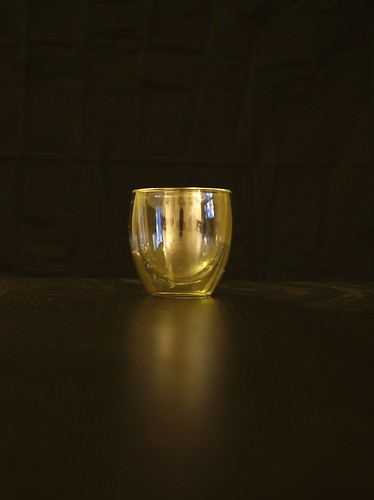
Glass is one of the trickier materials to photograph, mostly because it’s both transparent and highly reflective. Its transparency can be perplexing–how are you to photograph something that you can see right through?–and its highly reflective nature confounding as unwanted reflections and glare mar your images. With a thorough understanding of those properties, however, you can manipulate them to get just the image you want. In this case, let’s take a look at the process I went through to make this image of a glass of tea.
Starting Out With Some Theory (And Highly Scientific Diagrams)
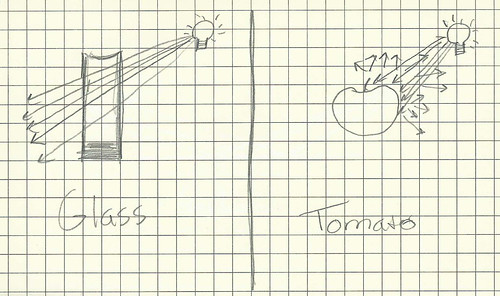
To begin with, it’s important to understand how glass works and how traditional photographic techniques fail when applied to it. Consider transparency first. When a ray of light encounters a pane of glass at a roughly right angle it passes right through, which is the reason that we can see through glass windows. This is in stark contrast, of course, to typical opaque objects which reflect light that strikes them and allow us to see them in the process. When photographing most objects we aim lights at them to reflect light back at us, but with glass this is a completely pointless endeavor: your light will pass right through the glass and fall on whatever is behind it.
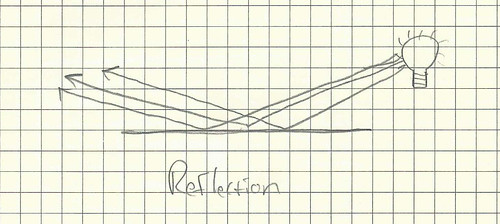
So we’ve established that you can’t show a glass object on camera by aiming a light directly at it, but then how can we possibly photograph it? This is where glass’ other key property comes into play: reflection. When light strikes a glass surface at a sufficiently shallow angle, it tends to reflect off of it. You can easily observe this by lowering your face very close to a glass table top. Instead of just seeing through it, you’ll also see a clear reflection in the glass.
We’ve noted that glass is transparent when viewed head-on, and also that it reflects light when viewed at a shallow angle. The trick to photographing glass objects is to exploit both properties. When you look at, say, a round glass teacup you’re mostly going to be looking straight through it and seeing the background. At the edges, however, the glass curves away from you at angles that cause reflection. Better yet, because of their curvature the edges will even reflect parts of your backgroundbeyond what your camera lens can see. So the key to a good glass photo is to put one colored background behind the object where your camera can see it through the glass, but surround it with a contrasting color which will only be visible reflected in the edges of the glass. It’s very common to use black and white as those contrasting colors. Photos with a white visible background and a black outer background reflected in the edges of the glass are called “bright field” images, while those with dark visible backgrounds and bright edges are called “dark field.”
Before continuing, I should add one caveat. I described glass as being transparent when viewed head-on and reflective when viewed at an angle, but that’s not precisely true. Glass will reflect a certain amount of light atany angle, and if that light is significantly brighter than what’s being viewed through the glass the effect may be very noticeable. This is the reason that uninformed attempts to photograph glass often turn into a nightmare of glare and unwanted reflections. To prevent stray reflections, it’s important that everything other than the background that you want reflected in the glass be kept in the dark. “Dark,” of course, is strictly relative. If you’re using a bright flash to light your background then you can easily leave the rest of the room at a comfortable level of illumination without any ill effects on your photo. If you’re using hot lights, it’s best to turn the room lights off before snapping the shot.
Setting Up The Shot
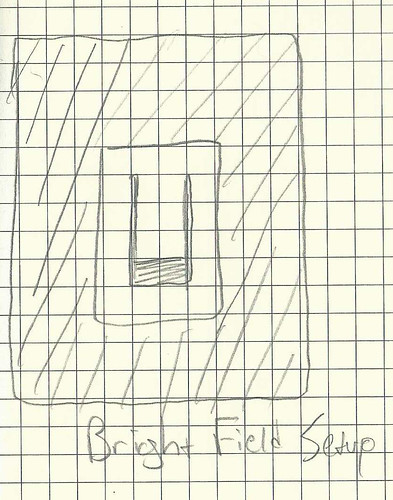
Now that we’ve covered the theory, let’s go through the process of setting up such a photo in practice. This is a bright field photo, so I started with the outer black background. I don’t have a proper backdrop stand any more, so I bought a cheap black bedsheet from Target, cut some holes in the corners and hung it up from a wall of my apartment. Then I set a coffee table in front of that backdrop and put the glass on top of it and positioned the camera as close as I could get it on a tripod. The devil is always in the details, and for glass photography keeping your camera put will make it much easier to get all the angles right as you go along.
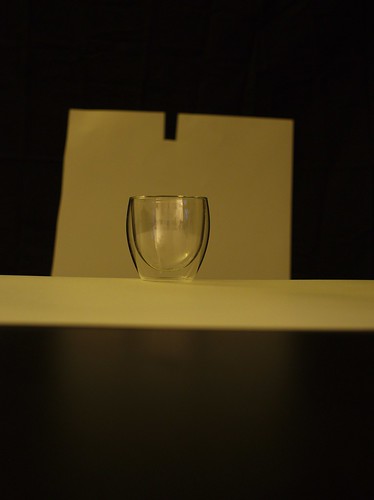
The next step was adding the white inner background. For this I just used some white poster board, which I positioned and cut down to size using my camera’s remote live view. If you don’t have such a feature available to you, this part can be a little bit of difficult trial and error and you may want to try to get someone to look through the camera while you position the background. It’s important to cut it down to a size that doesn’t extend much more than necessary from the edges of your glass object, because the smaller the inner background the thicker and more well-defined your edge reflections will be. Once I had the poster board cut and positioned, I cut a flap in the middle of the top, a corresponding hole in the black backdrop, and used it to hang up the board. I also added some white poster board underneath the glass on the table, although it didn’t end up being strictly necessary.
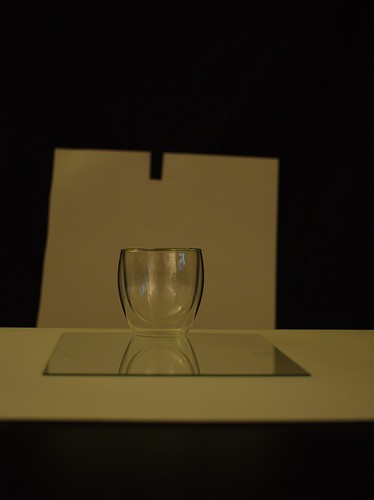
At this point you should be able to see a rough idea of where the image is heading by viewing the glass through the camera, or just looking at it from a perspective close to the camera. To proceed from this point, we’re going to need to light both the white background and the white poster board underneath the glass. Getting the surface under the glass lit evenly with the background can be a pain, so a useful trick is to instead put a pane of glass underneath your subject. You’ll be viewing it at a shallow angle and it will nearly perfectly reflect the background in front of you, and as a nice bonus give you a reflection of your subject. The only pane of glass I had on hand was taken from an 8x10 picture frame, but if you can get your hands on a longer one you can capture a reflection of your entire subject. Darker reflective surfaces like polished granite can also give you a less distinct reflection with a different surface appearance, and you may enjoy experimenting with them.
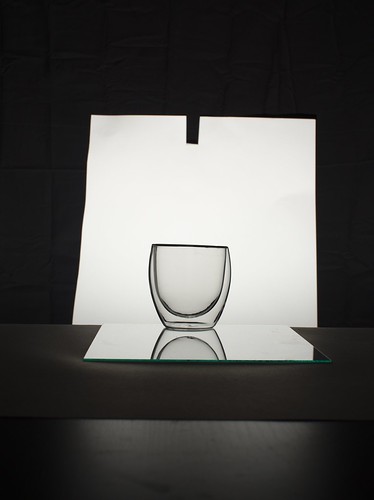
I should note that I also moved the glass pane up to the edge of the table shortly after snapping that last photo. At that point, the only thing left to do was to light the white background. Bright field images are especially easy in this regard, because all you have to do is uniformly light a relatively small area without spilling any into the rest of the environment. You could easily do this with a snooted flash at a decent distance, but I had a conveniently black coffee table in place already so I just set a speedlight underneath it pointed at the backdrop. Then it was just a matter of working out a reasonable exposure that would leave the rest of the room dark enough not to appear in the glass.
Here is a backed-up view of the entire setup. Note the small size of the white background relative to the larger black background, and also that the coffee table prevents the speedlight from illuminating the rest of the room. Ideally the white background should have been in the middle of the black one, but I don’t have any five foot tall coffee tables lying about.

Post Processing
Once I had everything set up I added some tea to my glass, so all the photos from here on will include it. I recently changed camera system and don’t have any reasonably long lenses yet, so I found myself with quite a bit of extraneous background. The first order of business was to rotate the image to straighten the top of the glass and crop it down until only the glass and background were visible. From there I used the levels tool to force the entire background/surface to white (and eliminate the seam between the two in the process) and most of the dark edges to pure black. This left me with a photo like this:
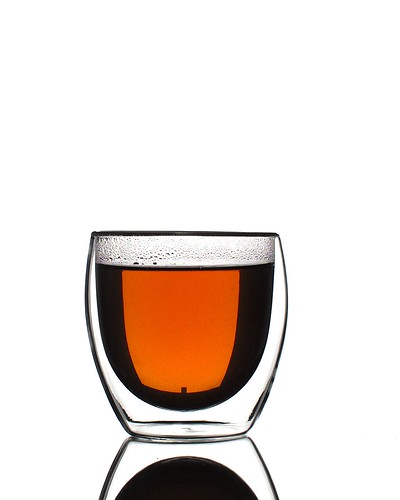
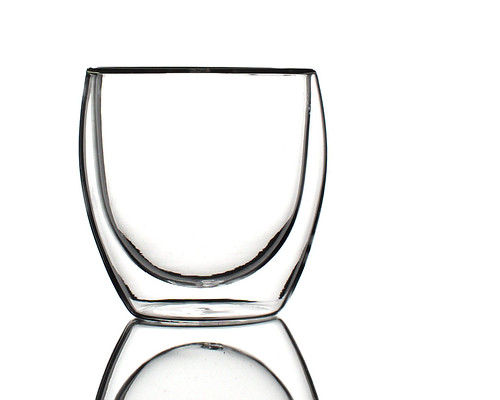
From here there were two adjustments left to make. The first was reframing the image, which is wonderfully simple when you have a pure white or black background; you can just add more of the background color in whichever direction you want to achieve the desired aspect ratio. If you capture a complete reflection of your subject you can also move it around at will in the frame, but since my reflection is cut off I had to keep the subject anchored to the bottom of the frame. The other problem was that the tea reflected the notch I used to anchor by backdrop in place (you can see it at the bottom of the visible tea), but that was easily cloned out leaving me with the final image. I also processed a frame of the empty glass by itself.
Closing Thoughts and Further Reading
What I ended up with after all this was a pretty basic bright field glass photo. From these basics, you can work outward into more complicated images. You may want to experiment with graded backgrounds, different surface materials, or overlapping glass elements. You can also add lighted elements nearer to the camera than the glass to deliberately add reflections to its surface. Be careful when doing this, as whatever light source you use to create the reflection will be clearly visible in the finished image. A softbox or reflector may reasonably pass for a window (for added effect, consider adding “window panes” to one with gaffer’s tape), but reflected umbrella spokes in a glass object are usually undesirable.
I learned pretty much everything I’ve used here from a book titledLight Science and Magic, which you should absolutely read if you’re interested in photographic lighting. It will teach you all about light from the very fundamentals, and works its way into more complicated subjects like successfully photographing glass and metal objects.