Largeish Format, Part III: Shooting the Scene
July 15, 2018
This is the third part of my series on creating stitched large format digital images. Part IV is now available.
We’ve covered the basic theory now, as well as the mechanics of connecting a digital back (or mirrorless camera) to your large format studio camera. Now it’s time for the fun part: setting up, composing and shooting your scene.
Needless to say, your scene needs to be still. If anything in it moves in between captures, the images won’t stitch together. I’ve only really used this technique for still life so far, but you could conceivably use it with landscape as well if you’re willing to drag a studio camera out into the world. You could also use the same technique to a more limited extent with a field camera and a sliding adapter, but you’d only be able to shift your exposures in one direction for a panorama (I wouldn’t recommend trying to use the back movements on a field camera, as it’s vital that you keep them as perfectly in-plane as possible).
Remember when setting up your scene that you’ll need to translate any tilt or swing movements to the front standard. If the rear standard is tilted, then rise and fall will cause you to capture different image planes. If it is swung, then shifting left and right will do the same. If the rear standard is perfectly straight up and down, side to side, then you can shift it in any direction while still sampling the same image plane.
With that in mind, let’s take a look at a still-life scene I set up. This is the view of the scene through the ground glass.
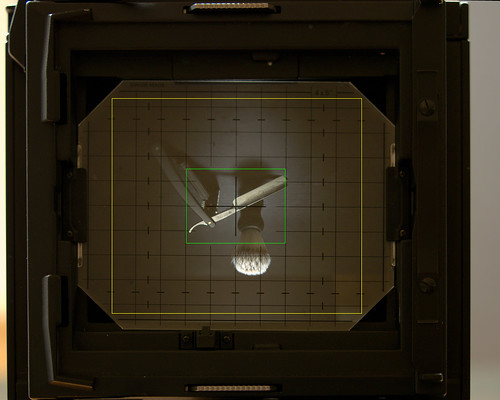
You’ll want to make sure that you keep in mind, roughly, the size of your sensor. The sensor on my digital back is 4.39x3.29cm in size, which I just remember as roughly 4x3cm to give myself a little bit of leeway with overlap.
Once you know your sensor size, you can visualize the images that you’ll be capturing on the ground glass. On the image here, I’ve highlighted the size of a single capture from the digital sensor in green. Note that what’s highlighted is not the true, exact size of the sensor, but rather the 4x3 area that I would mentally think of as “the frame” when looking at the ground glass in person (my ground glass is helpfully marked out in centimeters, as I believe most are). Trying to get much more precise than this while composing is, in my opinion, a waste of time. This process produces a lot of megapixels, so it’s easier to leave some room on the edges to crop than it is to try to forecast exactly where those edges will wind up.
The exact size of your final image will depend on the amount of shift, rise and fall that you can squeeze out of your camera without straining the bellows too much. If you find yourself in an awkward position where shifting very much away from center is straining the bellows, one of two things may help. If the distance between standards isn’t long, try using a bag bellows. If the distance is longer but movements on the front standard are causing the bellows to scrunch up awkwardly, try adding an intermediate standard and a second set of bellows just for the movements on the rear standard.
In practice, I’ve found that I can usually rely on being able to shift the rear standard about 3cm in any direction. This extends the boundaries of my effective image size by 3cm each way, which I’ve marked in yellow on the photo of the ground glass. When I’m actually composing an image, I try to keep everything I care about well within this boundary. You have to keep in mind that not only is your estimation on the ground glass not necessarily precise, but you will likely lose some of your edge area to the stitching process (more on that in the next part).
To actually capture the image, I start with my rear standard shifted 3cm up and 3cm to the left. I then capture an image, shift 1.5cm down, and repeat, until I get to a point where the standard is shifted 3cm below normal. At that point I shift 3cm to the right and start working my way back up. When I get to the top I shift another 3cm to the right, then keep capturing images all the way to the bottom. The end result is a series of 15 images that captures the entire scene, like this.
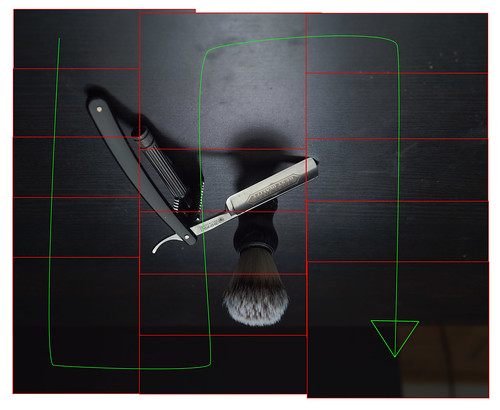
Note that in order to create this graphic I had to flip the individual images across both the horizontal and vertical axes. The digital back will normally correct the image orientation for you out of camera.
I now have 15 images with complete coverage, but I could have made do with 9. My sensor is more than 3cm tall, so using 3cm of rise/fall at a time would have sufficed. What are the extra six images for?
I mentioned in the last part of this series that manually waking the sensor for each shot has a tendency to exacerbate whatever weaknesses the sensor might normally exhibit. That includes centerfolding, where a visible seam appears in the image between the four separate quadrants that make up the entire sensor. To help ameliorate this and any other issues (hot pixels, color shifts, etc.), I like to give the stitching software more overlapping pixels than it really needs, so it can help smooth out those issues in the final image. If I were really ambitious I would move 1.5cm at a time in every direction, generating 25 images in total, but that’s a bit much for me. I’ve found 15 to be a good compromise between time spent capturing sections (and disk space spent storing them) and final image quality.
Now that our images are captured, all that’s left is to stitch them together. You could manually overlay them as I did in the graphic above, but that technique tends not to work seamlessly. Between slight color shifts in between images and minor distortions from the rear standard moving imperceptibly back and forth, you’ll wind up spending a lot of time to manually put together an image with some very visible artifacts. Good panorama stitching software will smooth out any minor inconsistencies and produce a final image that looks like it came from a single capture, a topic that we’ll cover in the next installment.