Largeish Format, Part II: The Hardware
July 6, 2018

This is the second part of my series on creating stitched large format digital images. Part III is now available.
Before I can get into the fun part, actually creating the photos, I want to cover some of the gritty physical details of actually connecting a medium format digital back to a large format studio camera. In particular I’ll be illustrating the use of a Leaf Credo digital back, because that’s the one I use. If you use a different brand of digital back, or a mirrorless camera, you will need to adapt these instructions to your own equipment.
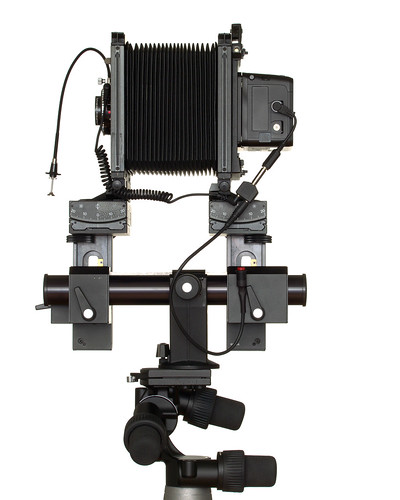
Let’s start with the most basic aspect of this setup, getting the back physically attached to the camera. This is the camera I use for these images, a Sinar P2.
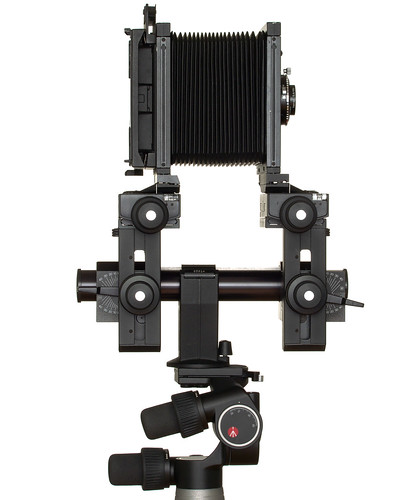
This is a pretty typical studio camera arrangement. A monorail connecting two standards, with the lens on one, the film or sensor on the other, and a bellows in between them. On the rear standard, we have a standard Graflock style back with ground glass.
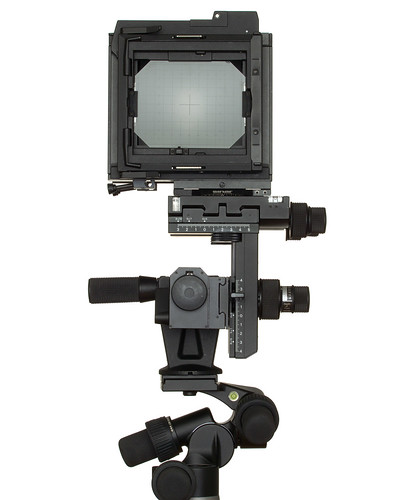
Now, of course you will find it quite impossible to fit a digital back underneath your ground glass in the place of a typical film holder. Thankfully, there is some precedent for rear standard attachments too bulky to fit underneath the glass (such as roll film holders), and the standard spring back has a solution built in. Simply press down on the two silver bars at the top and bottom (or left and right, if it’s oriented vertically) of your back and slide the ground glass assembly off.
Now at the top and bottom (or, once again, left and right if oriented vertically) of the back you’ll find the Graflok accessory bars. These will lower and raise to hold an accessory plate in place when you press in on the small tabs to the side of the bars.
Now all you need is a plate that can mount your preferred digital back. For mine, I used this relatively inexpensive adapter. Locked in place on my camera’s rear standard, it looks like this.
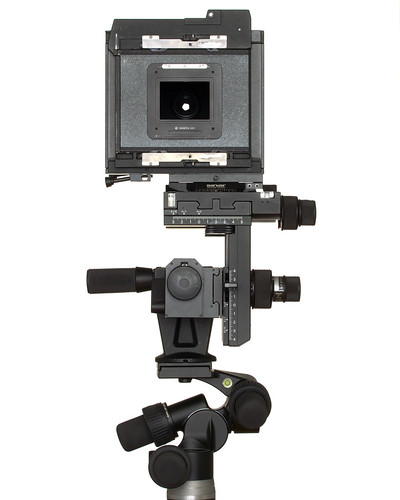
This adapter just puts a simple, contact-less metal mount for the digital back dead-center on the rear standard. A critical point to note here is that these adapters will not line your back up on the same plane of focus as the camera’s ground glass. That means that if the back you’re using doesn’t have live view, as some older models don’t, you’ll need to buy a more expensive adapter that allows you to slide a ground glass into place for focusing and composition, and then slide the back into place to take the image. This is one such adapter.
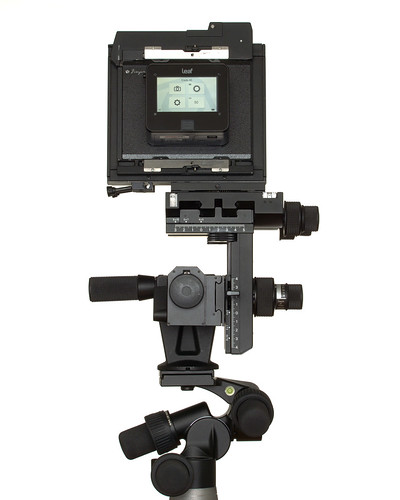
With the adapter in place, you can simply mount the back to it the same way that you would mount it to a camera. Be very careful before letting go of the back to ensure that it’s securely locked in place. I’ve found that the particular adapter I use doesn’t give nearly as much physical feedback on a successful lock as a medium format camera does.
Now the back is physically connected to the camera, but we still need to get it to successfully capture images. There’s nothing “smart” about the adapter plate we’ve mounted to the rear standard. It has no contacts, or any electronic parts at all. Its sole function is the physical connection of the back to the camera.
If we want to take some photos with this setup, we’ll need to connect the back to the lens so that it’s aware of the opening and closing of the shutter. While large format lenses don’t have any electronic contacts to convey this information, modern shutters do have an x-sync terminal that works well enough. When the shutter opens the contacts on the sync terminal are shorted together, and when the shutter closes they’re separated again. By connecting the shutter’s sync port to the remote release port on the back, you can effectively link the two together.
There is, however, a catch. Leaf Credo backs keep their sensors in a kind of sleep mode when not in use, which helps to preserve battery life and prevent heat build-up. The latter point is especially important, because medium format CCD sensors can get very noisy when they start to heat up. When connected to a medium format camera, this problem would be solved by the camera’s electronics sending a wake-up signal to the back just before releasing the shutter. Mounted to a mechanical view camera, this is obviously not an option. Instead, Leaf has created what they call two-shot mode.
Two-shot mode isn’t a setting you have to manually invoke, but rather the mode your back will automatically operate in when it’s turned on but not electronically connected to a camera (unless you go out of your way to turn it off, which is a setting you can find in your back’s manual). In this mode, the back expects to see two shots for every photo taken. The first shot wakes up the sensor, and the second shot actually captures an image.
If you have the x-sync port of the lens connected directly to the remote release, you can accomplish this by simply cocking and releasing the shutter twice. Aside from being cumbersome, however, this method will also lead to potentially high levels of noise in your images. The sensor turns on as soon as the shutter fires for the first time, and in the time it takes you to cock and release it again the sensor will heat up. For optimal image quality, the two signals need to come as close as possible to each other.
Mamiya/Leaf sells a special sync cable that can solve this problem with some manual intervention. They call it the wakeup cable, and you can find it by searching for its part #50300131. This cable is, essentially, a PC to 2.5mm sync cable with a small button on one end that you can push to manually short the two connectors together. To use it, you first push the button on the cable, which wakes up the sensor, and then trigger the shutter release. Notably, this cable costs $90 new for what is essentially a commodity PC to 2.5mm sync cable with a push button added.
Rather than using the expensive branded solution, I’ve crafted my own 3.5mm cable with a button at one end to connect the contacts together. I then connect this button cable with a splitter to the sync cable from my lens, and I’m able to achieve the same effect for about $85 less. Why 3.5mm rather than 2.5mm? Because I am unfortunately not especially good at soldering, and 2.5mm audio cables tend to have very small conducting wires inside of them. If you’re better at soldering than I am (or know someone who’s willing to do it for you), using a 2.5mm cable will simplify your setup.
These are the cables I use to connect my lens to the digital back.
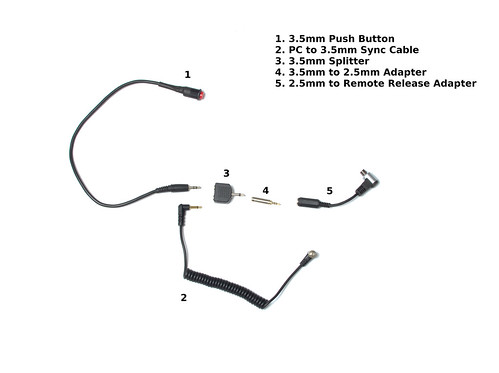
Let’s look at this one piece at a time.
The first element is my hand-made 3.5mm to push button cable. I used a 3.5mm stereo cable and soldered the two rings to the same side of the push button because I had some spare stereo cables lying around, but you would ideally use a 3.5mm mono cable for this. The important thing is that when you push the button, the contacts are shorted together.
To connect to the x-sync terminal on the lens, I use a commodity PC to 3.5mm flash sync cable. You can find these on Amazon or buy them from most camera retailers.
The push-button and the sync cable are both plugged into a 3.5mm splitter.
The splitter, in turn, plugs into a 3.5mm to 2.5mm adapter. You can skip this adapter if you use a 2.5mm to PC sync cable and rig your push button up to a 2.5mm cable, I’m only doing it this way because of my questionable soldering skills.
Finally, we plug the whole thing into the back with a 2.5mm to Mamiya remote release adapter, part #50300144. This is the one part of the sync cable arrangement that you have to buy from Mamiya/Leaf, as their remote release port is a completely proprietary standard that I haven’t been able to find any commodity replacements for. This adapter will run you about $120 new, although I picked mine up used on eBay for about $90.
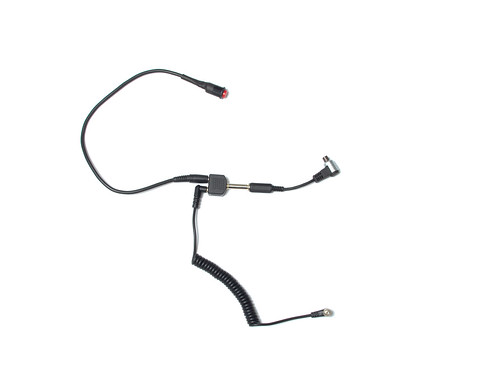
With all these pieces connected together, simply connect the PC sync connector to the x-sync terminal on the shutter and the remote release connector to your back, and you’ll be ready to start shooting.
This will, of course, make it impossible to connect a flash to the x-sync terminal of your lens. If you wish to use flash with your digital back on a large format camera, connect the flash to the PC sync port on the back itself, which provides a replacement for the one it occupies on the lens (and also ensures that the sensor is on and active when the flash fires).
To take a photo with this setup, the process goes like this:
Use live view or the ground glass on a sliding adapter to focus.
Close and cock the shutter.
Take the wake-up button in one hand and your cable release in the other.
First push the wake-up button, then trigger the cable release.
You’ll want to trigger the shutter as quickly after pushing your wake-up button as possible. As soon as you press that first button the sensor wakes up and starts generating heat, so the longer you take to make the actual exposure the noisier your final image will be. Unfortunately, there’s also such a thing as triggering them too close to each other, as the back requires a certain minimum time between the two events. With practice you’ll learn to push the two buttons in just the right sequence.
Now that that’s all done, you should have a digital image on the back taken through your view camera. This covers the hardware you’ll need, so in the next entry we’ll look at the process of composing and shooting a full scene.