Largeish Format, Part IV: Stitching The Images
August 2, 2018
This is the fourth and final part of my series on creating stitched large format digital images.
Now that you’ve shot the individual parts of your scene, all that’s left is to stitch them together into one giant image. For this task you are of course free to use whatever software you’re comfortable with (and you may very well not need my help here), but for anyone who’s not familiar with panorama stitching I’m going to lay out the procedure I use with Hugin, an open source, cross platform panorama editor and stitcher.
As a disclaimer, I’m not by any means an expert on panorama stitching. However, I seem to have found a technique that more or less works for me, so I’m going to present it here in the hopes that it can help you.
Largeish Format, Part III: Shooting the Scene
July 15, 2018
This is the third part of my series on creating stitched large format digital images. Part IV is now available.
We’ve covered the basic theory now, as well as the mechanics of connecting a digital back (or mirrorless camera) to your large format studio camera. Now it’s time for the fun part: setting up, composing and shooting your scene.
Largeish Format, Part II: The Hardware
July 6, 2018
This is the second part of my series on creating stitched large format digital images. Part III is now available.
Before I can get into the fun part, actually creating the photos, I want to cover some of the gritty physical details of actually connecting a medium format digital back to a large format studio camera. In particular I’ll be illustrating the use of a Leaf Credo digital back, because that’s the one I use. If you use a different brand of digital back, or a mirrorless camera, you will need to adapt these instructions to your own equipment.
Largeish Format, Part I: The Theory
July 1, 2018
This is the first part of my series on creating stitched large format digital images. Part II is now available.
Over the past few months, I’ve started working with a 4x5” view camera and using what I believe is a somewhat novel technique for digital imaging with it. There is, unfortunately, no commercially available digital back at the moment that comes anywhere near the size of 4x5 film, let alone 8x10 and larger. LargeSense may change that in the near future, but the single-capture large format cameras they’re developing are going to be very bulky and exorbitantly expensive (expected price for the upcoming release of the 8x10 version is $106,000 USD).
You can, however, mount a digital medium format back (or a mirrorless camera) to the rear standard of a view camera. Combined with rise, fall and shift on the rear standard, you can sample different portions of the image circle projected by a large format lens for static scenes. Those samples can then be stitched together digitally, producing a single very large image. Using this technique I’ve gotten up to an effective sensor size of around 3x4 inches, which is why I’ve taken to calling these photos “largeish format.”
Profiling Light Mod Surfaces
April 7, 2018
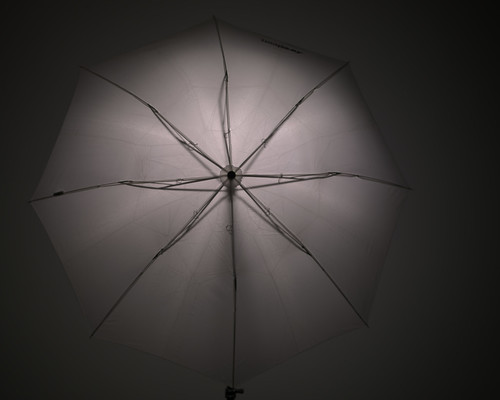
Recently I picked up a Rogue FlashBender, because I wanted a light modifier I can travel with and use on speedlights with a little more directionality to it than an umbrella. I love my shoot-throughs, but they throw light everywhere, and getting my hands on some studio lights, softboxes and beauty dishes recently has really given me an appreciation for lights with more control.
I got the biggest version of the FlashBender, which comes with a couple of diffusion surfaces you can stick on the front to, theoretically, create a look very much like a small softbox. I was worried about the evenness of the light, however, because the entire unit is still very shallow. So I decided to do some tests on the light mods I travel with to see just how evenly their surfaces light up. I don’t have a light meter with me on this trip, but I realized there was a much easier way to test and visualize this: just point a camera at the light.